Wednesday, April 25, 2012

Fig & Toasted Almond Liquid Nitrogen Gelato


Serves 8-10

Every year I have the opportunity to play Mr. Wizard at work on “Take Your Children to Work Day”. This year I made Liquid Nitrogen gelato for the kids and they loved both the show and the taste of the gelato. I had fun at the same time J If you have access to liquid nitrogen and you know how to safely handle it this is a great dessert for a party—if not just use your ice cream maker.

Having fun with molecular gastronomy
4 C Whole Milk
1 Vanilla Bean (split)
1 C Sugar
3 TBS plus 2 tsp Cornstarch
1 tsp Vanilla Extract
1 C Fig Preserve
1 C Almond Slices (toasted)

Preheat your oven to 350 degrees F. Spread the almonds in a single layer on an ungreased shallow baking pan. Bake for 10 to 15 minutes, stirring occasionally, until golden. Start watching it at 10 minutes to make sure they do not burn. Place them on a plate in the refrigerator to cool.

Heat 3 cups of milk with the split vanilla bean in a saucepan over medium heat.

In a medium bowl whisk the remaining 1 C of whole milk with the sugar and cornstarch until incorporated.

When the milk comes to a simmer (small bubbles around the edge of the pot) take it off the heat and add the cornstarch mixture, stirring continuously until well mixed. Return the saucepan to medium-low and keep stirring until it starts to thicken. This will take 10 to 12 minutes—do not walk away. You must stir continuously or the milk will burn. It will end up the thickness of gravy and should coat the back of a spoon.

Pour the mixture through a strainer into a mixing bowl, whisk in the vanilla extract, and cool on the counter for 20 minutes. Place the gelato mixture in a sealed container for 2-12 hours in the refrigerator.

At this point you can put the gelato base into an ice cream maker using the manufacturer's instructions or you can get adventurous and make Liquid Nitrogen (LN) gelato. If you decide to go the LN route, safety is top priority. Liquid nitrogen splashed or poured on the skin will instantly freeze anything it touches. Use extreme caution. Here are some sites you should check out before proceeding.

Material Safety Data Sheet for Liquid Nitrogen
Mark Powell's Food Hacking site

If you are using liquid nitrogen to make your gelato, put on your face shield and cryo gloves. Place the gelato mixture into the metal bowl (do not use a glass bowl) of an electric mixer. Turn the mixer to medium-low and slowly add the liquid nitrogen a little at a time. Keep adding the LN until the gelato mixture looks semi-hard.

Put 1 cup of fig jam into a bowl and mix up so that it loosens. Slowly fold in the fig jam and the toasted almonds into the gelato.

You can serve it immediately as a soft serve or you can place in a closed container in the freezer until completely set (about 2-4 hours).

To print this recipe, go to Fig & Toasted Almond Liquid Nitrogen Gelato

Sunday, April 22, 2012

Stelvio Cheese


I recently tastes a new cow's milk cheese from Northern Italy called Stelvio. It has the cream semi-soft texture of a Fontina and the sharp assertive aroma and taste of an aged Parmesan Reggiano. It's a wonderful buttery flavor is a perfect accompaniment to an antipasto, a cheese tray, a sauce or on top of a pizza. This cheese melts well without jeopardizing its flavor or aroma. You will most likely find it at a cheese shop that has a good selection of Italian cheeses. I buy mine locally at Capri Flavors in Morrisville, NC.


Stelvio cheese nestled with some capicola


Seeded Italian Bread


One of my fondest food memories of growing up in New York was the seeded Italian bread. This is also something that is not available in the south where I live. The loaves were entirely covered with sesame seeds and they had a crispy brown crust and a soft moist interior. Now some grocery store chains have fairly decent baguettes but no one has the seeded Italian bread I grew up on. I have finally come up with a compromise that is pretty good and locally available. I take the brown and serve loaves from the bakery department, coat them with an egg wash, cover them with sesame seeds and then bake them until they are golden brown. There is nothing better than the taste of loaf of Italian bread that has a crispy golden crust enrobed in toasted sesame seeds. So until my next trip to New York this makes my taste buds very happy. It’s great to serve with antipasto, soup, or to make a sandwich. Just a note on the sesame seeds. Do not buy them at your local megamart—they are way too expensive. Go to an Asian market and they will cost 1/3 the price.

Unbaked Seeded Italian Bread
Ingredients
1 Egg (whisked)
1 Loaf unbaked Brown and Serve Italian Bread
½ to 1 C Toasted Sesame Seeds (depends on the size of the loaf and density)

Preheat oven to 425°F

Seeded Italian Bread
Place the loaf of bread on a piece of waxed paper. Whisk the egg in a small bowl then brush the top half of the bread with the egg. Sprinkle with sesame seeds to coat. Turn the loaf over and coat the other side first with the egg then with the sesame seeds. Take the seeds that have fallen on the wax paper and press them into the loaf. Place the seeded Italian bread on a cookie sheet. Bake for 10-14 minutes on the middle rack of your oven until they are a golden brown. Start checking the bread after 8 minutes.

To print this recipe, go to Seeded Italian Bread


Copyright © 2011 by Nicholas Verna. All Rights Reserved. No part of this recipe may be reproduced in any form or by any electronic or mechanical means including information storage and retrieval systems without written permission from the author.

Sunday, April 15, 2012

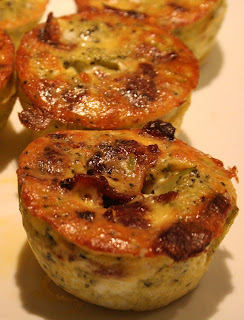
Mini Breakfast Frittatas


Servings: 6 Mini Frittatas

I sometimes get tired of cereal for breakfast every morning but it takes too long to make eggs. I then started to think about how I could make eggs in advance. The answer came from one of my favorite quick dinners, a frittata. This Italian version of an omelet is easy, quick and uses up the leftover vegetables in the refrigerator. So what I came up with were mini frittatas made in cup cake pans. They came out so good that they would be excellent served as part of a brunch or reheated in the microwave for breakfast. They pack the intense flavor of the bacon, the sharpness of the cheese and the savory flavor of the broccoli enrobed in a creamy egg.

It this dish a frittata or a quiche? It’s not really a frittata or a quiche. A frittata typically has the same ingredients as this recipe but is usually started on the stove top and finished in the oven. It’s not a quiche because it does not have a pie crust or any cream that are typical of quiches. It’s more of a hybrid of the two.

Mini Frittata in Cup Cake Pan
3 Slices Oscar Meyer Bacon (fried and crumbled) *
6 Lg Eggs
1/8 tsp Table Salt
2 TBS grated Italian Cheese
1 C cooked Broccoli (I used leftover broccoli) *
Cooking Spray

Cup Cake Pan

Preheat oven to 350°F. When the oven has reached temperature, place your empty cup cake pan in the oven to heat.

Fry the bacon until crisp. Place on paper towels to drain then crumble when cook.

In a small mixing bowl, beat the eggs, salt and cheese together until thoroughly mixed. Chop the broccoli finely and add to the eggs.

When the cup cake pan has heated take it out of the oven using an oven mitt and spray 6 cups with cooking spray. Place it back in the oven for one minute to allow the cooking spray to heat up.

Remove the cup cake pan from the oven on a hot plate and divide the egg/broccoli mixture into the six sprayed cups. Divide the bacon and place it on top of the six frittatas. Place the frittatas back into the oven. After 15 minutes test the frittatas by inserting a knife in the center. If it comes out wet place it back in the oven for an additional 5 minutes. Test again for doneness.

Place a plate or platter over the top on the cooked frittatas and flip it over. The frittatas should just fall out. Serve immediately or wrap in plastic wrap once they have cooled and place them in the refrigerator for up to two days. Reheat them in the microwave.

* PRONTO SUBSTITUTE
Bacon – For a sharper flavor used diced pancetta that has been fried up crisply.
Broccoli – Any fully cooked vegetable that can be chopped up finely, such as zucchini, or small vegetables like corn and peas can be used in this dish.

To print a copy of this recipe go to Mini Broccoli Frittata.

Saturday, April 7, 2012

Chicken and Waffles


Servings: 4 sandwiches

Chicken & Waffles
I recently had the opportunity to taste a southern classic, chicken and waffles. I thought it was good but it was on the heavy side with the deep fried chicken breasts. I decided to lighten it up by baking the chicken and dialed up the flavor with some grated Italian cheese and garlic butter. Just imagine a crispy waffle covered with garlic butter nestling crispy parmesan chicken and sweet roasted red peppers

Waffles *
8 4”x4” Waffles – I use Aunt Jemima® Pancake Mix but you can use any waffle mix you like.

Parmesan Chicken
4 Boneless Chicken Breasts
2 Lg Eggs
1 tsp Olive Oil
1 ½ C Panko Bread Crumbs*
1 C grated Parmesan Cheese
2 tsp dried Parsley
1 tsp Garlic Powder
Cooking Spray
Parmesan Chicken
1 Jar of Roasted Red Peppers (drained)

Garlic Butter *
1/2 stick Unsalted Butter (softened)
2 Cloves Garlic (minced)
Pinch tsp Red Pepper Flakes (optional)
1 tsp Fresh Basil (chopped finely)
Pinch Table Salt
2 grinds Freshly Ground Black Pepper

Directions

Make sure that your butter has sat at room temperature for at least 1 hour before making the garlic butter. Preheat your oven to 350°F

Trim the fat off of the chicken cutlets and carefully cut the chicken into 2 thin cutlets using a very sharp knife.  Many grocery stores now sell thin chicken cutlets for scaloppini.  They work just as well but are a bit more expensive. In the first bowl beat the eggs with 1 tsp of water and 1 tsp of olive oil. In a second large bowl mix the bread crumbs, cheese, parsley, and garlic powder.

Grease a large cookie sheet with cooking spray. Dip each cutlet first in the egg then in the breadcrumb mixture until coated on both sides.  Place the cutlets on the cookie sheet and place them on the middle shelf of the oven for 20 minutes.  After the 20 minutes, turn your oven to broil for an additional 5 minutes. Watch them carefully so that they do not burn. They should be a light golden brown color. I test for doneness using an instant read thermometer reading a temperature of 180°. If you prefer, you can fry the cutlets in oil until golden brown.

Preheat your waffle iron.

While your chicken cutlets are baking prepare the garlic butter. Place the unsalted butter, minced garlic (use a garlic press), red pepper flakes, chopped basil, salt and pepper in a bowl and whisk until light and fluffy. Refrigerate any unused garlic butter to make garlic bread.

Make your waffles and place them on a wire rack after removing them from the griddle so that they don’t get soggy.

When the chicken is ready, spread a thin layer of the garlic butter on a waffle. Place 2 baked chicken breasts on the waffle and cover the chicken with drained roasted red peppers. Top with the remaining waffle. Serve immediately.

Sunday breakfast has always been one of my favorite meals. Whether its eggs, pancakes or waffles I look forward to this meal every week. This sandwich was the first time that I used waffles to make a sandwich and the taste was wonderful. If you want your waffle to be extra crispy you can put it in a toaster on light.

* Pronto Substitutes

Waffles – If you are pressed for time or you just don’t own a waffle iron you can use Aunt Jemima frozen waffles.

Garlic Butter – you can substitute Pestonaise©, a healthy alternative to mayonnaise or you can also add ½ tsp pesto to ¼ C of mayonnaise.

Panko Bread Crumbs – you can substitute plain bread crumbs but the chicken will not be as crispy.

To print a copy of this recipe go to Chicken & Waffles.


Copyright © 2012 by Nicholas Verna. All Rights Reserved. No part of this recipe may be reproduced in any form or by any electronic or mechanical means including information storage and retrieval systems without written permission from the author.

Sunday, April 1, 2012

Garlic Seared Tuna on Spinach


This simple but elegant dish is worthy of the finest restaurants.  The tender garlic seared tuna is served on a bed of wilted spinach with sauteed garlic and onions. It is simple and will melt in your mouth with a loud pop of flavor.

4 Servings

Tuna
4 Tuna medallions (1 ½ inch thick)
1 TBS Olive Oil
½ to 1 tsp Kosher Salt
Fresh Ground Pepper
1 tsp Garlic Powder
1 tsp dried Parsley
2 TBS Salted Butter

Spinach *
1 medium Onion (sliced)
1 TBS Olive Oil
2 tsp minced Garlic
1 bag of washed Fresh Express Baby Spinach
½ tsp Salt
Fresh Ground Pepper

Preheat your oven to 350°F.

Brush the tuna medallions with olive oil and coat both sides with the salt, plenty of fresh ground pepper (to taste), garlic powder, and parsley.  Put back in the refrigerator for 15 minutes.

Peel and slice the onion.  Heat 1 TBS of olive oil in a large frying pan and add the onion and cook until translucent (5-10 minutes).  When the onions are cooked add the garlic and sauté for another 30 seconds.  Add spinach (you may have to add in batches until it wilts), salt, and pepper and cook until the spinach is wilted, constantly turning the mixture. 

Heat the butter in an oven safe medium frying pan over high heat just until the butter begins to brown at the edges.  Immediately place the tuna medallions in the pan and cook until lightly browned on all sides. 

Raw - If you like your tuna raw in the middle serve immediately.

Medium - If you like your tuna pink in the middle, place the frying pan with the tuna in a preheated 350° oven for 5 minutes.

Well - If you like your tuna pink in the middle, place the frying pan with the tuna in a preheated 350° oven for 10 minutes.

Divide the spinach between 4 plates and place the tuna on top.  Serve immediately. *

Cooking Tuna

Just like their red four legged cousin, everybody prefers their tuna cooked to a different degree of wellness.  Some like it red and cold on the inside and others like it gray and hot on the inside.  No matter how you like your tuna, the critical factor that will affect it’s taste is freshness.  I recommend that you purchase sashimi grade tuna from a reputable fishmonger.  If it doesn’t smell fresh it is not fresh and no matter how you cook it will not taste good.  Always buy fish and cook it the same day.

* PRONTO SUBSTITUTES

Spinach – This tuna will go equally well on top of your favorite salad.

Serving suggestion Serve with rice and asparagus parmesan.

To print a copy of this recipe go to Garlic Seared Tuna.